220 dryer plug wiring How To Guide
Welcome to our comprehensive guide on 220 dryer plug wiring. Whether you’re a seasoned DIY enthusiast or a beginner looking to save some money on electrician fees, this article will provide you with all the essential information you need. We’ll cover the basics, troubleshoot common electric dryer problems ensure you have a safe and functional setup. Let’s dive in!
Understanding 220 Dryer Plug Wiring
In this section, we’ll cover the fundamentals of 220 dryer plug wiring to ensure you have a solid foundation before diving into the specifics.
What Is 220 Dryer Plug Wiring?
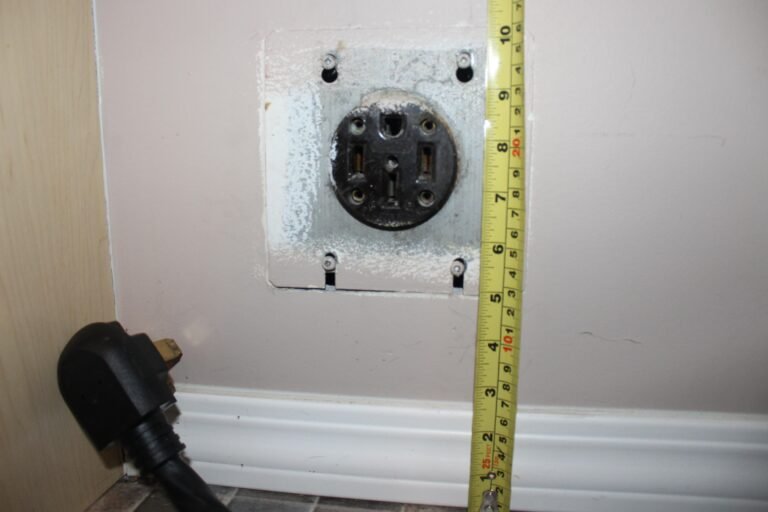
220 dryer plug wiring, also known as a 4-prong dryer outlet, is a crucial part of connecting your electric dryer to the power source. It involves a specific configuration of wires and connectors to handle the higher voltage needed for these appliances.
Why Is Proper Wiring Important?
Correctly wiring your dryer is essential for safety and functionality. Improper wiring can lead to issues like the “dryer breaker keeps tripping,” electrical fires, or damage to your dryer.
Components of 220 Dryer Plug Wiring
To understand the wiring process better, let’s break down the key components involved:
1. Dryer Outlet
The outlet is where your dryer’s plug connects to the electrical system. It typically has four slots for prongs.
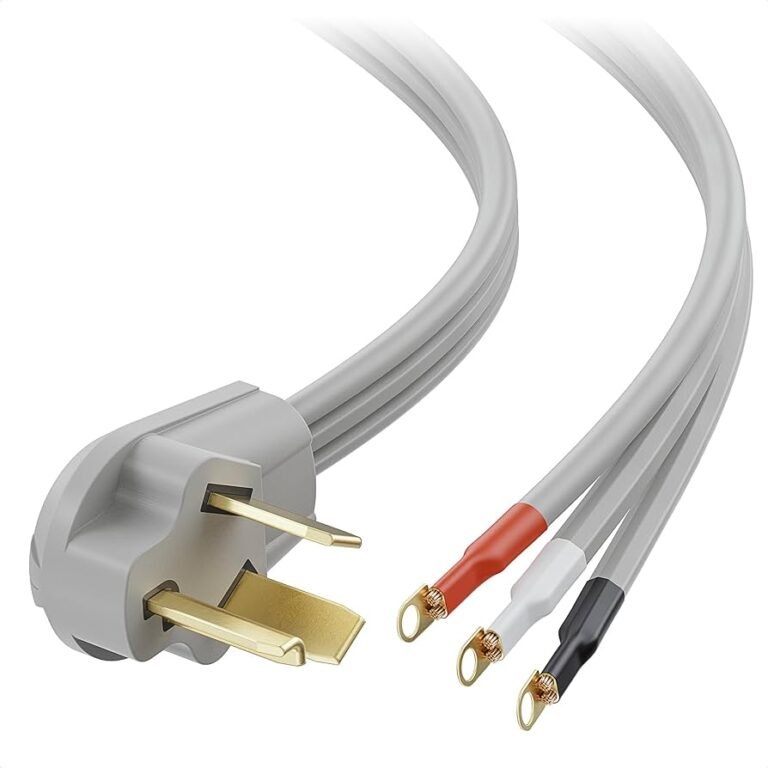
2. Dryer Plug
The dryer plug has four prongs that correspond to the slots in the outlet. It’s essential to match them correctly.
3. Wiring
The wiring consists of four wires: two hot wires (red and black), a neutral wire (white), and a ground wire (green or bare copper). The hot wires carry the electrical current, the neutral wire provides a return path, and the ground wire ensures safety by grounding any excess electricity.
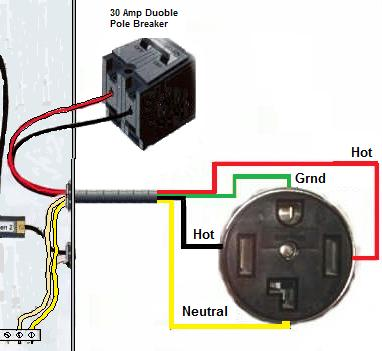
4. Circuit Breaker
The circuit breaker in your electrical panel controls the power supply to the dryer outlet. It should be rated at 220 volts and equipped with a dedicated circuit for your dryer or check what size breaker for electric dryer guide.
Step-by-Step Guide to 220 Dryer Plug Wiring
Now that we’ve covered the basics, let’s walk through the process of wiring your dryer correctly to avoid issues like the “dryer breaker keeps tripping.”
1. Gather Your Tools and Materials
Before you start, ensure you have the necessary tools and materials:
- Screwdriver
- Wire stripper
- Voltage tester
- 4-prong dryer cord
- Dryer outlet
- Electrical tape
2. Turn Off the Power
Safety first! Go to your electrical panel and turn off the circuit breaker that supplies power to the dryer outlet. Confirm that the power is off by using a voltage tester.
3. Remove the Old Cord
If you’re replacing an existing cord, unplug it from the outlet and disconnect it from the dryer. Carefully examine the old cord for any signs of damage or wear.
4. Examine the Outlet
Inspect the outlet to ensure it’s in good condition and properly grounded. If you notice any issues, such as loose wires or a damaged outlet, it’s advisable to replace it read about what size wire for an electric dryer should be used.
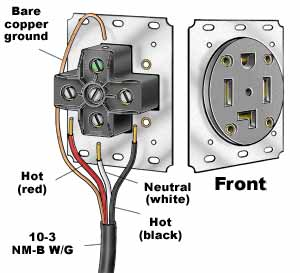
5. Connect the New Cord
Follow the manufacturer’s instructions provided with your 4-prong dryer cord. The typical configuration involves connecting the red and black wires to the hot prongs, the white wire to the neutral prong, and the green or bare copper wire to the ground prong. Use the wire stripper to expose the necessary length of wire for secure connections.
6. Secure the Connections
Using a screwdriver, secure the wires to their respective prongs. Ensure the connections are tight and free from any exposed wire. Cover the connections with electrical tape for added safety.
7. Plug In the Dryer
Once the cord is securely attached, plug it into the dryer outlet. Make sure it fits snugly, and there’s no wobbling.
8. Turn On the Power
Return to the electrical panel and switch the circuit breaker back on. Verify that the dryer is receiving power by turning it on and ensuring it operates without any issues.
wiring a 3 prong 220 outlet
Wiring a 3-prong 220-volt outlet is a relatively straightforward process, but it’s important to follow safety precautions and consult with a qualified electrician if you’re not comfortable with electrical work. This guide will provide a general overview of how to wire a 3-prong 220-volt outlet:
Materials and Tools You’ll Need:
- 3-prong 220-volt outlet
- Electrical cable (usually 10/3 wire for dryer or 8/3 wire for dryer, depending on your circuit’s requirements)
- Wire stripper/cutter
- Screwdriver
- Wire nuts
- Electrical tape
- Junction box (if required by local electrical codes)
Safety Precautions:
- Always turn off the power to the circuit at the main electrical panel before working on electrical wiring.
- Use appropriate safety gear, such as gloves and safety glasses.
- If you are unsure or uncomfortable with the process, consult a licensed electrician.
How Do You Wire A 220V Plug With 3 Wires?
10 Steps to Wire a 3-Prong 220-Volt Outlet:
- Turn Off the Power: Go to your electrical panel and locate the circuit breaker that supplies power to the outlet you are working on. Turn off the circuit breaker to ensure there is no electrical current flowing through the wires.
- Select the Cable: Depending on the requirements of your circuit, choose the appropriate electrical cable (usually 10/3 or 8/3). This cable should have three insulated wires: two hot wires (usually red and black) and one neutral wire (usually white).
- Install the Junction Box (if required): Some local electrical codes may require you to install a junction box where the new outlet will be located. If necessary, follow local codes and install the junction box securely to the wall or framing.
- Prepare the Wires: Strip about 3/4 inch of insulation from the ends of the wires using a wire stripper. You should have three insulated wires: two hot wires (usually red and black) and one neutral wire (usually white).
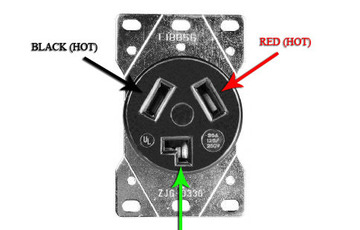
- Connect the Wires to the Outlet: Attach the wires to the 3-prong 220-volt outlet as follows:
- Connect the white neutral wire to the silver screw or terminal on the outlet.
- Connect the red and black hot wires to the two brass screws or terminals on the outlet. It doesn’t matter which hot wire goes to which brass screw.
- Secure the Outlet: Carefully insert the outlet into the electrical box, ensuring that no wires are pinched or damaged in the process. Secure the outlet to the box using screws provided with the outlet.
- Double-Check Connections: Before proceeding, double-check that all wire connections are secure and that there are no exposed wires. Use wire nuts to cap any exposed wire ends, and wrap them with electrical tape for added safety.
- Install the Outlet Cover: Place the outlet cover over the outlet and secure it in place with screws.
- Restore Power: Return to the electrical panel and turn on the circuit breaker for the outlet. Confirm that the outlet is working correctly by testing it with a 220-volt appliance or a voltage tester.
- Final Inspection: Inspect your work one final time to ensure that all connections are secure and that there are no exposed wires. Make sure the outlet cover is securely in place.
That’s it! You’ve successfully wired a 3-prong 220-volt outlet. Remember to follow all local electrical codes and safety guidelines when performing electrical work, and if you have any doubts or concerns, consult with a qualified electrician. Electrical work can be dangerous, so safety should always be the top priority.
Common FAQs on 220 Dryer Plug Wiring
How many wires for a 220 dryer outlet?
A typical 220 dryer outlet requires four wires: two hot wires (usually red and black), one neutral wire (usually white), and one ground wire (usually green or bare copper). This configuration is commonly referred to as a 4-prong dryer outlet.
Can I use 10 2 wire for a dryer?
No, it is not recommended to use 10-2 wire for a dryer. A dryer typically requires a 4-wire configuration (10/4 or 8/4 wire) to provide both the required 220V power and the necessary grounding for safety. Using 10-2 wire, which lacks the neutral wire and grounding conductor, may not meet electrical codes and safety standards.
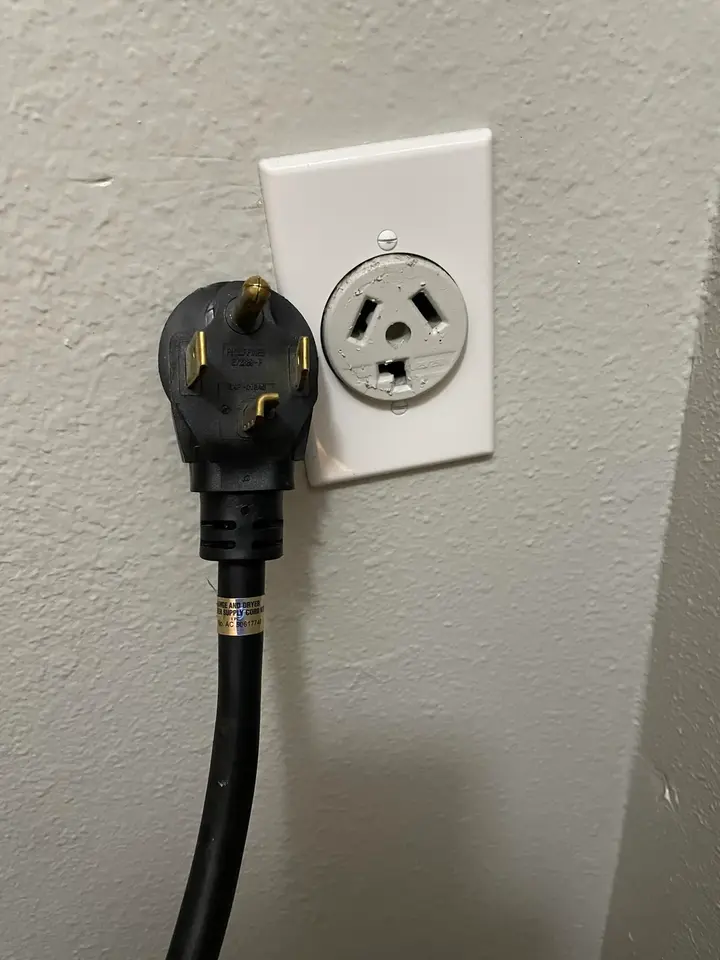
Are dryer plugs 3 wire or 4 wire?
Dryer plugs can be either 3-wire or 4-wire, depending on the electrical code and the age of the installation. Older homes may have 3-wire dryer outlets, while newer installations are required to have 4-wire dryer outlets for increased safety. A 3-wire dryer plug includes two hot wires and one neutral wire, while a 4-wire dryer plug includes two hot wires, one neutral wire, and one ground wire.
Please note that electrical codes and regulations can vary by location, so it’s essential to consult with a local electrician or check local codes to ensure compliance with your specific installation requirements.
How do I know if my dryer is 220 volts?
Most modern electric dryers require a 220-volt outlet. You can check your dryer’s voltage requirements in the user manual or on the manufacturer’s label, usually located near the dryer door or inside the door frame.
Why does my dryer breaker keep tripping?
If your dryer breaker keeps tripping, it could indicate various issues. Common causes include overloading the circuit, a faulty circuit breaker, loose or damaged wiring, or a malfunctioning dryer. It’s crucial to troubleshoot the problem systematically to identify and address the root cause.
Can I convert a 3-prong dryer outlet to a 4-prong outlet?
Yes, it’s possible to convert a 3-prong dryer outlet to a 4-prong outlet to accommodate newer dryer models. This conversion is essential for safety and compliance with current electrical codes. However, electrical work should always be performed by a qualified electrician to ensure it’s done correctly.
Is it safe to DIY 220 dryer plug wiring?
While DIYing 220 dryer plug wiring is feasible, it’s essential to prioritize safety. If you have experience with electrical work and follow safety precautions, you can attempt the installation. However, if you’re unsure or uncomfortable with electrical tasks, it’s strongly recommended to hire a licensed electrician to ensure a safe and compliant installation.
How often should I inspect my dryer outlet?
Regular inspections of your dryer outlet are crucial to identify any wear and tear, loose connections, or signs of damage. It’s advisable to perform an annual check, but also inspect it whenever you notice any issues with your dryer’s performance or if the “dryer breaker keeps tripping.”
What’s the average cost of hiring a professional for dryer plug installation?
The cost of hiring a professional electrician for dryer plug installation can vary depending on your location and the complexity of the job. On average, you can expect to pay between $150 and $300 for this service. Factors such as the distance from the electrical panel and the need for additional electrical work can affect the final cost.
Conclusion
Properly wiring your 220 dryer plug is crucial for safety and the efficient operation of your dryer. By following our detailed step-by-step guide and understanding the key components involved, you can tackle this task confidently. Remember to troubleshoot any issues promptly and consider hiring a professional if you’re unsure about the process. Enjoy hassle-free laundry days with a well-wired dryer plug!